Role Management
- 25 Mar 2024
- 3 Minutes to read
- Contributors


- Print
- DarkLight
Role Management
- Updated on 25 Mar 2024
- 3 Minutes to read
- Contributors
- Print
- DarkLight
Article Summary
Share feedback
Thanks for sharing your feedback!
Note
If the Role Management feature is not present in Migrate, you are using the new Syniti Knowledge Platform security feature. Refer to Manage User Security for more information.
About Role Management
The Role Management section of Security maintains the Roles and attaches Users and Features to these Roles. The system provides roles that should cover all of the standard positions and activities of users on a project. Role Management allows the responsible users ability to modify the existing roles as well as assign users to roles. The role of Administrator contains all roles - that role is the top and Administers to all other roles.
The user logs into the system with a Syniti Knowledge Platform ID and password setup through the Syniti Support service. This single sign on (SSO) process with authenticate the user's credentials based upon the assigned Tenant and User ID. When a user logs into Syniti Migrate for the first time via SSO, if the user does not have an account within Syniti Migrate they are automatically created. When doing so, the system assigns them roles based on their setup in the SynitiKnowledge Platform
The role mapping from Syniti Knowledge Platform to Syniti Migrate translate as follows:
SKP | Syniti Migrate |
|---|---|
admin | MIGRATION_ADMIN |
business-admin | MIGRATION_DEVELOPER |
author | MIGRATION_MAPPER + MIGRATION_DESIGNER |
viewer | MIGRATION_READONLY |
Dependencies & Prerequisites
Before building and using Role Management, the users must be loaded and activated. This section of the system aligns the users to the appropriate features for their job role. Refer to section Administer > Security > Users Management for details of creating and maintaining a User of the Migration application.
Working in Role Management
View the following page by navigating to Administer > Security > Role Management from the Syniti Migrate Home page. The Role Management page displays a list of roles available to assign to Users and the Features that are available to each of the Roles. Roles are not set to Active or Inactive - they are used or not used.
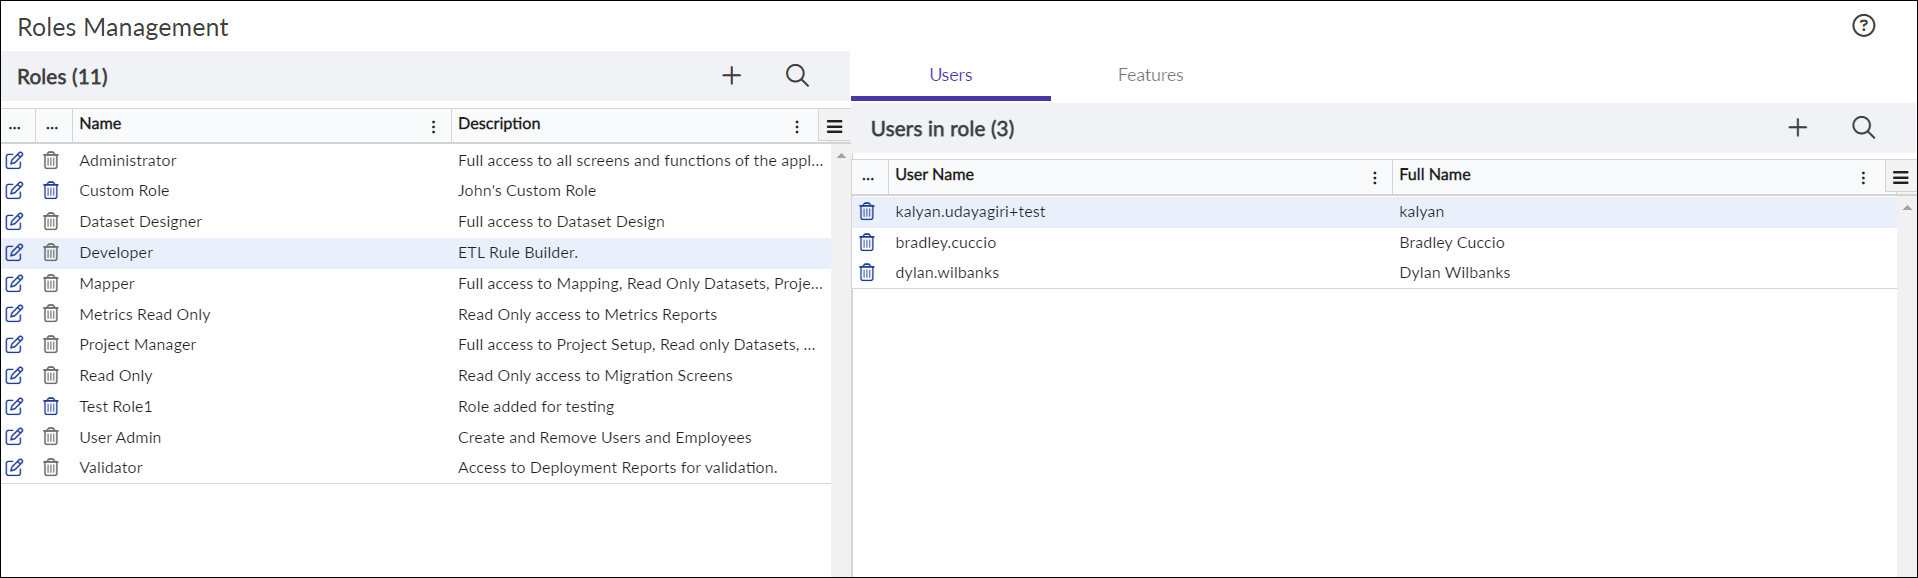
The Roles panel displays the following fields:
Heading | Definition |
|---|---|
Name | Name of the Security Role. |
Description | The description of the Security Role. |
Note
The Administrator role contains all access, and that role can grant access for others to have Administrator access. USER ADMIN was designed to be given to a Help Desk person, or some other non-ADMIN so they can create new users. This role is not provided Administrator access so that they cannot provide Administrator access for themselves or others.
A set of default Roles installs with the system. The Role Description provides details for the use of each Role.
Each Role comes loaded with Features that provide access to pages within Migration as shown below. A few of the pages also come with Child security where certain panels may be locked down more than the overall security for the overall page.
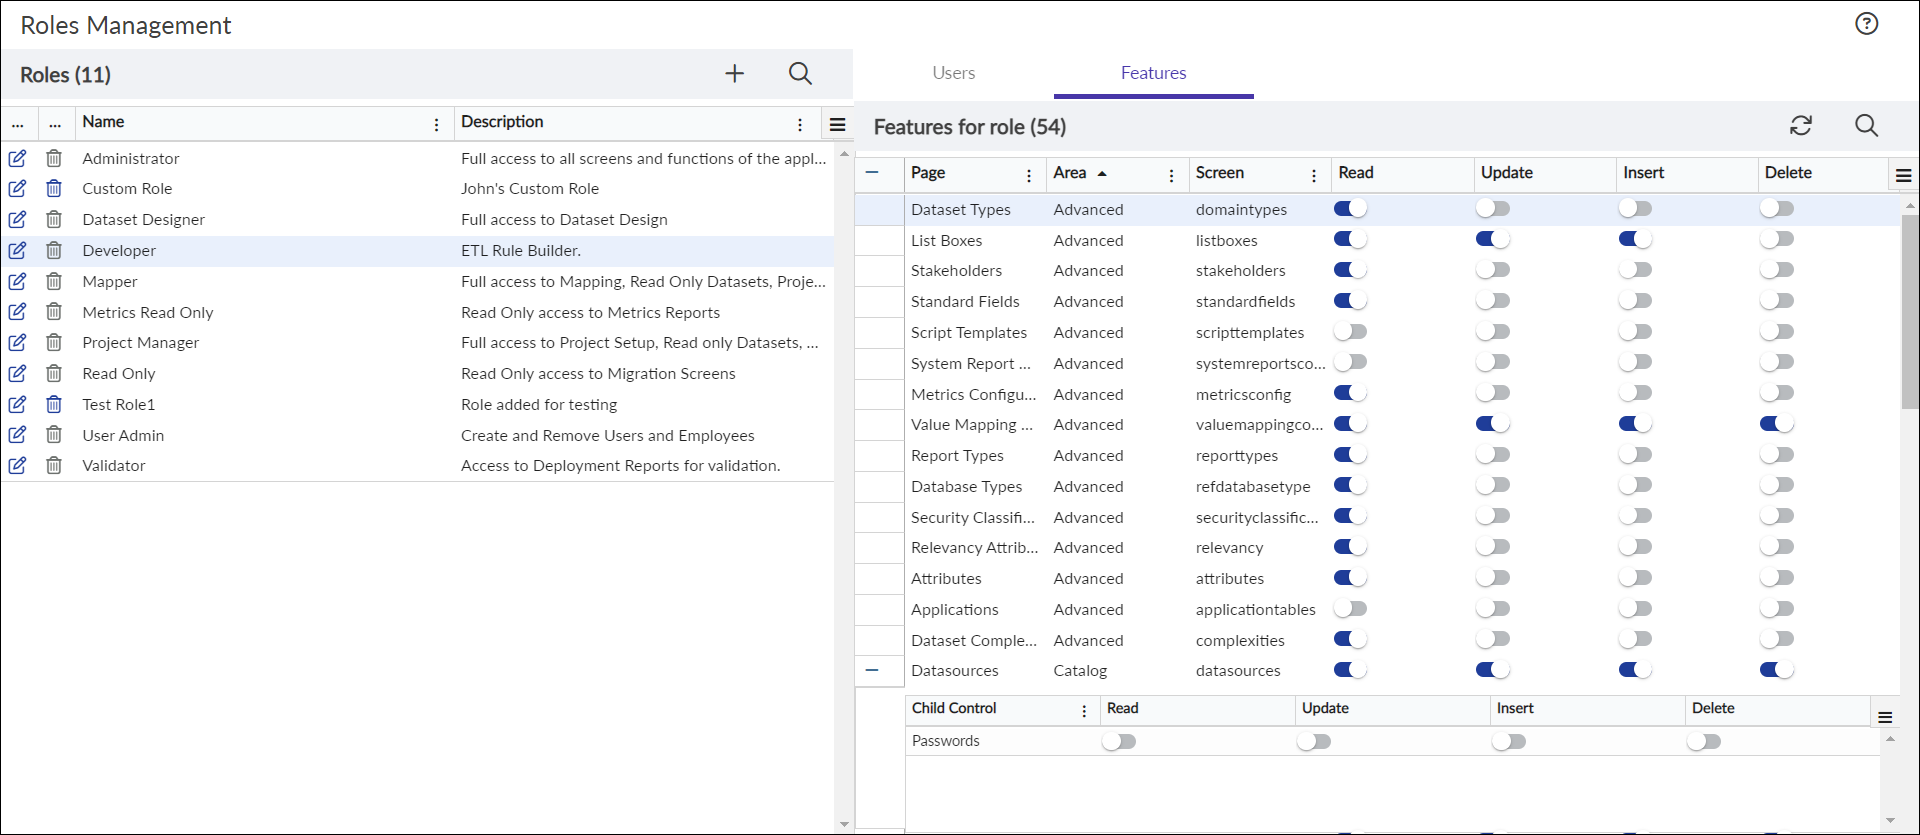
The Features panel displays the following fields:
Heading | Definition |
|---|---|
Page | Page name |
Area | Migration Menu - vertical area. |
Screen | URL link page name |
Read | Toggle to allow read access to page. |
Update | Toggle to allow update access to page. |
Insert | Toggle to allow insert access to page. |
Delete | Toggle to allow delete access to page. |
The Users panel displays the following fields:
Heading | Definition |
|---|---|
User Name | User ID within Migration. |
Full Name | User First and Last Name. |
Add a Role for Security
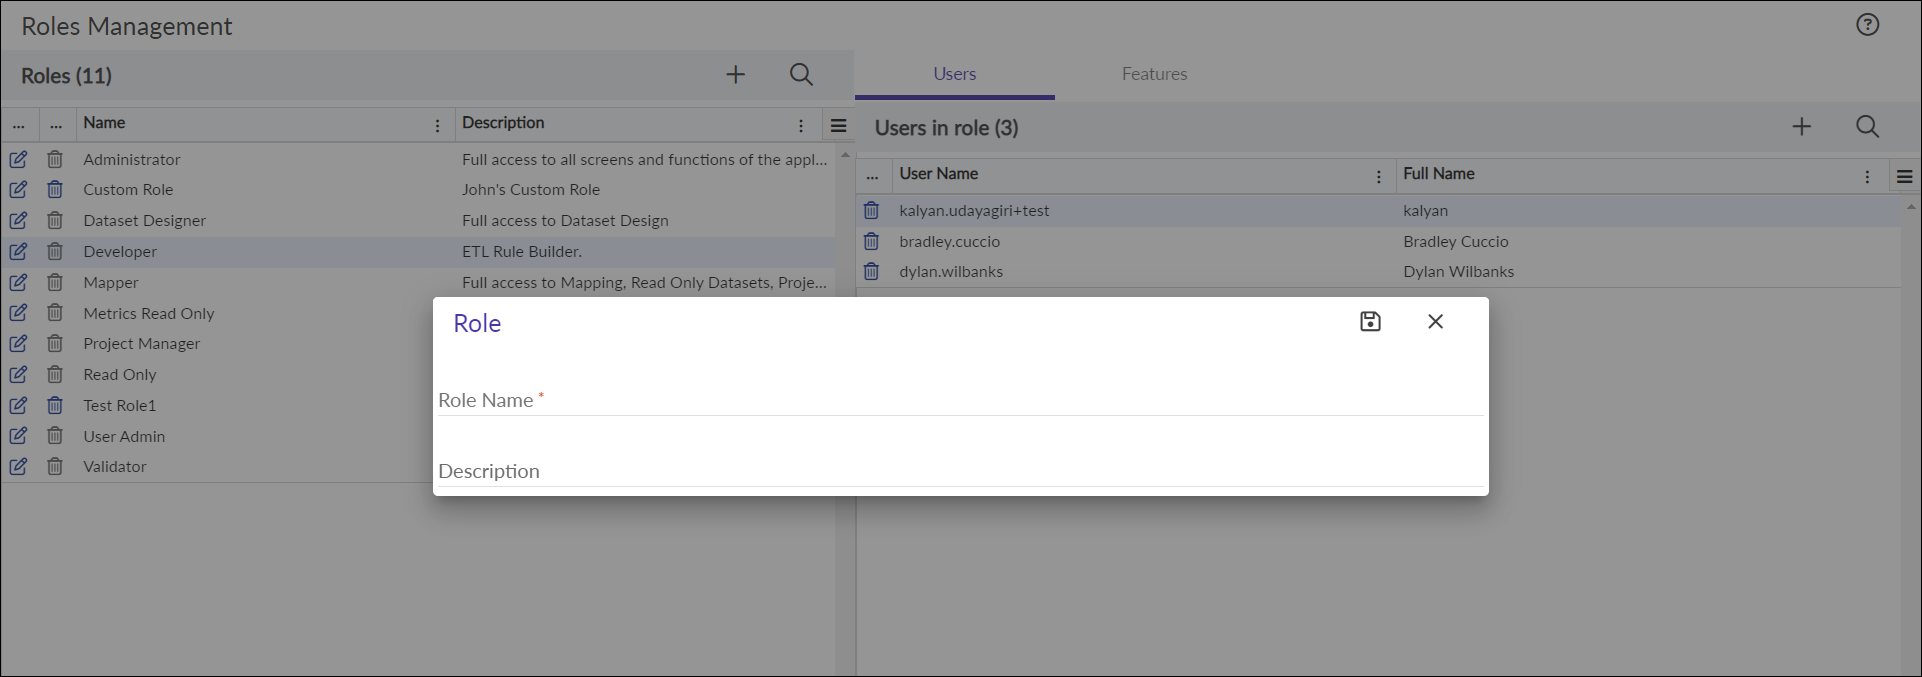
Follow these steps to add a role to security:
Click on the Add
 icon within the Roles panel to open a window to add the Role.
 Enter the Role Name and the Description to proceed.
Note
Role Name is required but Description is optional.
When finished with edits, click the Save
 icon to complete.
 icon within the Roles panel to open a window to add the Role.
  icon to complete.
The new Role displays in the list of Roles.
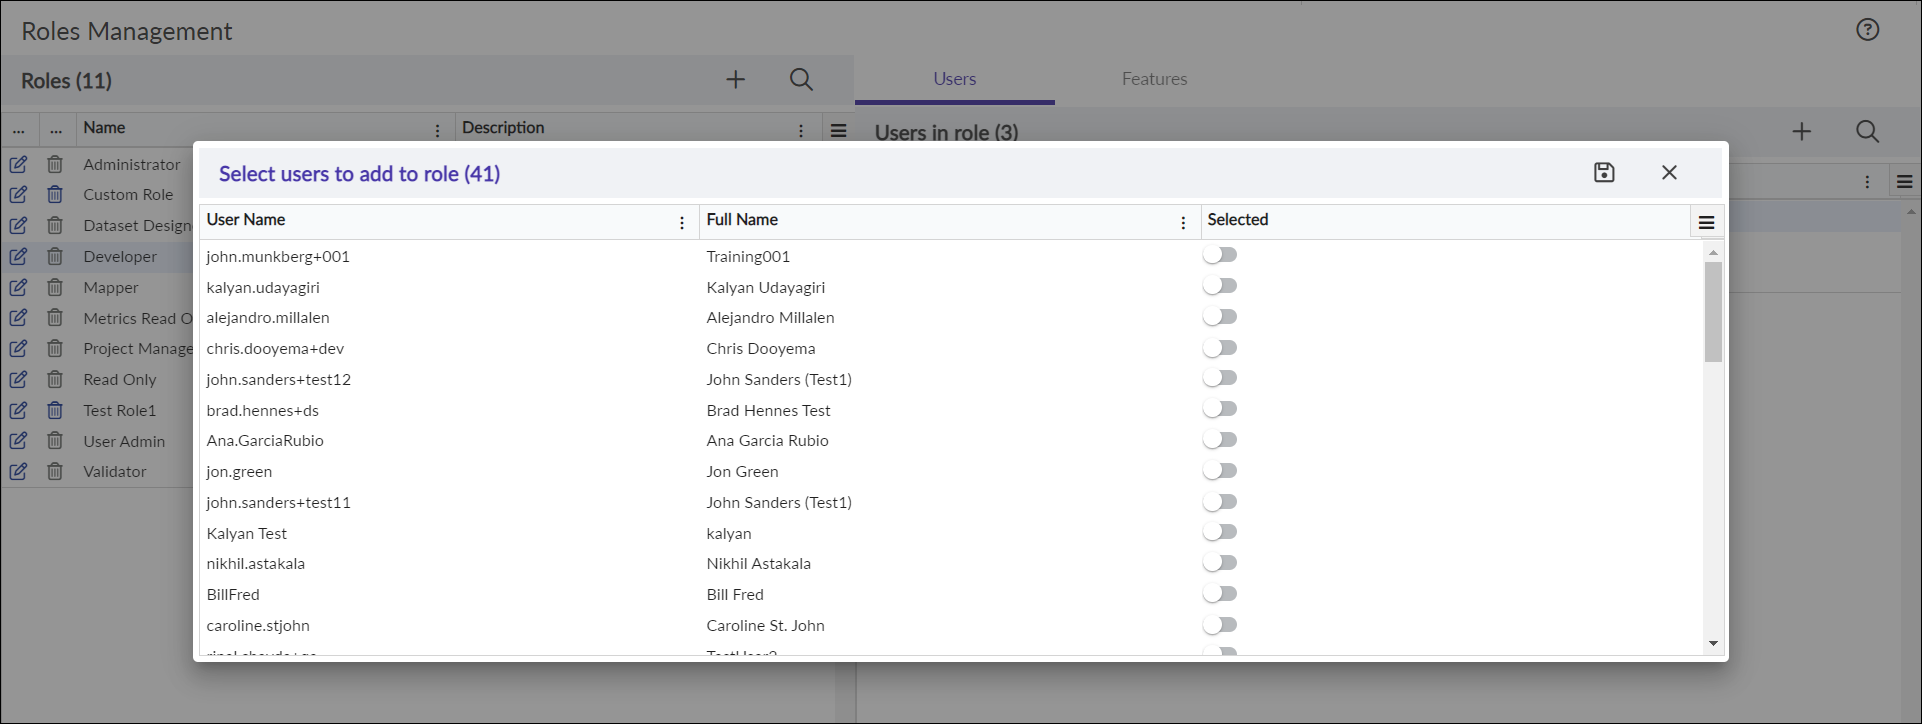
Add Users to a Role
Follow these steps to add a user to a role:
Click the Add
Icon within the Users in role panel. Note
A dialog box for selecting users displays.
Toggle as Selected for each User Name to add them to the list of users for this role. Multiple users may be added at one time.
When finished with edits, click the Save
icon to complete.
Add Features to a Role
Follow these steps to add features to a role:
Select the appropriate Role within the left panel of the page.
Click the Features tab title within the right panel of the page to view the Features for role panel.
Toggle the settings for each feature based upon the Area (Menu Path) and the Page (page name) to limit the access to Read, Update, Insert, or Delete actions for this role.
.png)
Note
Child Control breaks up the page into sections for security. Currently pages Mapping, Datasources, and Dataset Design are intracate enough to require this more granular security. The page contains more access, and then at the Child Control level the access is reduced.
Refer to the Appendix for a detailed chart of the Syniti default roles.
Was this article helpful?